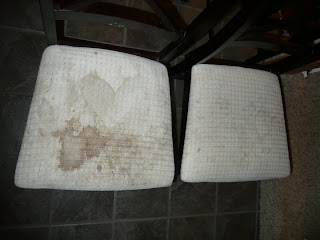
They stayed decently clean until Taeya came along. At first, we delegated her to one specific chair and also covered it with a dish towel to protect it. After a few months, she started moving around to different chairs for whatever reason or we'd have guests and she'd end up on a chair she didn't normally sit on. She also drank soy milk which she seemed to spill at nearly every meal. How does that happen? It always soaked through the towels and stained not only our chairs but her clothes as well. It wasn't long before our chairs looked like this:
 |
| Our original WHITE covered chairs at the end of their life |
Yuck! We didn't even like sitting on them, even though we knew they were just stained. It was DEFINITELY time to recover our white dining room chairs and recover them we did.
It really wasn't a very difficult or time consuming process and the end result was dramatically different from what we started with. First, my husband and I stopped at Joann's going out of business sale and picked out a DARK fabric we both liked. I liked it A LOT but Phil finally caved and agreed to use it as well. He now likes it as well. I love that it's dark and has a print all over it because it makes any spills much harder to spot. While we were at Joann's, we also purchased some clear plastic to try out as well. More to come on that at the end of the post. We borrowed a staple gun and a compressor and would have finished this project in one evening except that we ran out of staples. So, it took us two evenings and probably a total of about 2-3 hours to recover all six chairs.
 |
| The material we chose |
I first took the seat off of one chair and cut out six pieces of material with enough extra to wrap around the bottom edges of the chair. Phil and I then worked as a team to remove the rest of the seats and we recovered them together. It was much easier doing this with two people because one could make sure the material was straight and pulled tight while the other managed the staple gun. We stapled the new material right over the top of the old seat covers. The most time-consuming part of this project was screwing the seats back onto the chairs when we were finished.
 |
| Phil working on our chairs |
 |
| Three of my beautiful newly covered chairs. |
On our last two chairs, we used the clear plastic we purchased to cover the material to make child-proof dining room chairs for each of our kids. We figured we would cover just two chairs with the plastic (over top of our new material) to use with the kids and that we'd rip it off when they outgrew the messy stage. We didn't put the plastic on all six because we thought it would be somewhat uncomfortable to sit on. We found out that it's actually not uncomfortable, sticky etc. If we were to do it again, we'd recover ALL six of our chairs with the plastic protection.
 |
| Our plastic covered chair |
 |
| Plastic covered chair on the right, regular material on the left |
We love, love, love our new chair covers and although there have been a few spills on them, they still look amazing and I love that I can easily wipe off the two plastic covered chairs which we really try to have Taeya sit on when she eats. We now no longer dread sitting on our filthy dining room chairs and love how it's made our dining room look so much classier and cleaner.
Have you ever recovered something? Are your dining chairs in need of recovering? If so, give it a try! If you don't have access to a compressor and staple gun, you can purchase a hand held one that doesn't need a compressor at your local hardware store.


thanks for sharing this. recovering our dining room chairs is a project that needs doing in our home too. even though the covers are brown, they are old and worn, plus the one that Ezekiel sits on is obviously nasty (partially from potty training time, ugh!). even though i have a beach towel folded in half laying on it. and now he often decides "i don't need a towel" and shoves it onto the floor. so yeah. thanks so much for the tip on the plastic too, i was thinking i would look for fabric that was already plasticy (like some table cloths are) but that would be really limiting, so i love the idea to cover them with clear plastic.
ReplyDeleteGreat! I'd love to see your finished product when you recover the chairs.
ReplyDeleteLooks great!! They look brand new :-) The plastic was a great idea!!!
ReplyDelete~Whitney
This is great! I was looking for something like this to do with our kitchen chairs. What kind of clear plastic did you use? Was it thick or thin? Thanks in advance!
ReplyDeleteStephanie, I used a medium thickness plastic. I felt the different thicknesses at the craft store and didn't want it too thin or too thick. For some reason, the #7 sticks in my mind but I purchased it awhile ago so I can't really say what thickness it is exactly. Just make sure it can bend and fold fairly easily.
DeleteYour chairs turned out so beautiful! I really need to tackle mine. I'm thinking of painting them also.
ReplyDeletethanks for the inspiration!
thank you so much for this post, I've covered my dining room chairs before but it before kids! I'm ready to do it again but with the plastic for sure :) your chairs look lovely!
ReplyDelete