I keep sharing this recipe with friends on Facebook so I thought I would add it to my blog so I could just direct them here. The recipe I use was originally found here. I have made one slight change that makes it much easier to use. I have been using this soap for a few months now and I haven't had any problems with it. My dishes appear clean and I haven't had any soap build-up on the glass. I make my own laundry soap with borax and washing soda so I always have most of these ingredients on hand.
I store my soap in an old baby wipe container and wrote the recipe on the side in permanent maker so I don't have to go look it up each time I need to remake it. I keep a measuring spoon from an old oxi-clean container inside so I always have a scoop ready to measure out the soap.
Mix together:
2 cups borax
2 cups washing soda
1 cup kosher salt
Use approximately 1 Tablespoon per load in addition to approximately 1 tsp of Lemi-Shine.
Although the original recipe has you mix the lemi-shine into the other ingredients, I have found that by leaving it separate, my mixture no longer clumps. It remains pourable/scoop-able and it's much easier to just add the lemi-shine separately than having to try to chisel pieces off of the clumped together soap.
Enjoy!!

Showing posts with label Simply Homemade. Show all posts
Showing posts with label Simply Homemade. Show all posts
Wednesday, December 12, 2012
Saturday, October 8, 2011
Simply Homemade: Canned Fruit
Well, my blog has been hibernating over the summer months. We're now into Fall and I'm hoping life will slow down a bit during these colder months. I put my blog on the back burner because I have been doing so many projects these past months I just haven't had time to blog. However, I'd like to get back into it, both on this blog and on our family blog.
The past few years, I have been doing some canning for our family. With having Brecken last November, I didn't even try to can anything. However, this year, I have made four loads (7 qts/load) of cinnamon pears, 2 loads of apple pie filling, 2 loads of peaches and one batch of applesauce (so far). Some of this was done with one of my friends and some of it I did alone.
Growing up, my mom canned every summer and my sister and I would help her. We always got our fruit from a local farm. When I lived in Silt, CO, I had a friend, Kristi, who used to stop at people's houses who had fruit trees where the fruit was dropping unused onto the ground. She would stop and ask them if they were going to use their fruit and ask if she could pick the fruit if they weren't going to use it. I have now been doing this for a couple years and have hardly had to pay for any of the fruit I have canned. I've received tons of free apples, free pears and found free plum trees on the side of a frontage road that wasn't on anyone's property. I've also posted on Freecycle asking for free fruit and have received responses each time. This makes for an awesome deal on fruit for our family. All I end up paying for is sugar for preserving and lids if I need them for my jars.
I was running out of canning jars recently so I also asked on Freecycle for mason jars. Just yesterday, I picked up 7 BOXES full of canning jars. That should keep me busy for awhile! (I'll be sharing them with my friend as well). So, if you're interested in canning but maybe don't want to shell out a lot of money to get started, keep your eyes open for fruit that you can pick yourself and ask on Freecycle. Find a friend who has canning supplies (waterbath/pressure canner etc.) that you can borrow. Canning is also much more fun with a friend. It's a lot of work but it truly is worth it.
I'd like to share my apple pie filling recipe. It's easier to make than applesauce because you just have to peel and slice the apples and stuff them into jars. No cooking down and putting them through the strainer. Here's the recipe. It's a great one!!
Apple Pie Filling
Makes enough filling for 7 quarts of pie filling.
Mix together: 4 ½ cups sugar, 1 cup cornstarch, 2 teaspoons cinnamon, 1 tsp salt, 1 teaspoon nutmeg. Wisk together the dry ingredients before adding water to prevent lumps.
Add: 10 cups water
Cook until thick and bubbly while stirring occasionally.
Peel, core and slice about 32 apples. Pack raw apples in jars and pour syrup over. Fill to w/in ½ inch of rim.
Cooking Time in a pressure canner: 5 lbs at 10 minutes add 1 lb pressure for each 1,000 feet
Also, if you'd like to make cinnamon pears, just add a teaspoon of cinnamon to your syrup. They taste so amazing with the addition of cinnamon!
 |
| Homemade Cinnamon Pears |
The past few years, I have been doing some canning for our family. With having Brecken last November, I didn't even try to can anything. However, this year, I have made four loads (7 qts/load) of cinnamon pears, 2 loads of apple pie filling, 2 loads of peaches and one batch of applesauce (so far). Some of this was done with one of my friends and some of it I did alone.
Growing up, my mom canned every summer and my sister and I would help her. We always got our fruit from a local farm. When I lived in Silt, CO, I had a friend, Kristi, who used to stop at people's houses who had fruit trees where the fruit was dropping unused onto the ground. She would stop and ask them if they were going to use their fruit and ask if she could pick the fruit if they weren't going to use it. I have now been doing this for a couple years and have hardly had to pay for any of the fruit I have canned. I've received tons of free apples, free pears and found free plum trees on the side of a frontage road that wasn't on anyone's property. I've also posted on Freecycle asking for free fruit and have received responses each time. This makes for an awesome deal on fruit for our family. All I end up paying for is sugar for preserving and lids if I need them for my jars.
I was running out of canning jars recently so I also asked on Freecycle for mason jars. Just yesterday, I picked up 7 BOXES full of canning jars. That should keep me busy for awhile! (I'll be sharing them with my friend as well). So, if you're interested in canning but maybe don't want to shell out a lot of money to get started, keep your eyes open for fruit that you can pick yourself and ask on Freecycle. Find a friend who has canning supplies (waterbath/pressure canner etc.) that you can borrow. Canning is also much more fun with a friend. It's a lot of work but it truly is worth it.
I'd like to share my apple pie filling recipe. It's easier to make than applesauce because you just have to peel and slice the apples and stuff them into jars. No cooking down and putting them through the strainer. Here's the recipe. It's a great one!!
Apple Pie Filling
Makes enough filling for 7 quarts of pie filling.
Mix together: 4 ½ cups sugar, 1 cup cornstarch, 2 teaspoons cinnamon, 1 tsp salt, 1 teaspoon nutmeg. Wisk together the dry ingredients before adding water to prevent lumps.
Add: 10 cups water
Cook until thick and bubbly while stirring occasionally.
Peel, core and slice about 32 apples. Pack raw apples in jars and pour syrup over. Fill to w/in ½ inch of rim.
Cooking Time in a pressure canner: 5 lbs at 10 minutes add 1 lb pressure for each 1,000 feet
Also, if you'd like to make cinnamon pears, just add a teaspoon of cinnamon to your syrup. They taste so amazing with the addition of cinnamon!
Monday, April 11, 2011
Simply Homemade: Reupholstered Dining Room Chairs
This is one of my favorite DIY projects to date. When Phil and I decided to purchase a new dining room table (pre-kids), we loved the table we purchased but weren't super excited about the white, yes, WHITE material that the chairs were covered with. We decided that we'd buy the chairs and someday, when the white was no longer that color, that we'd reupholster them.
They stayed decently clean until Taeya came along. At first, we delegated her to one specific chair and also covered it with a dish towel to protect it. After a few months, she started moving around to different chairs for whatever reason or we'd have guests and she'd end up on a chair she didn't normally sit on. She also drank soy milk which she seemed to spill at nearly every meal. How does that happen? It always soaked through the towels and stained not only our chairs but her clothes as well. It wasn't long before our chairs looked like this:
Yuck! We didn't even like sitting on them, even though we knew they were just stained. It was DEFINITELY time to recover our white dining room chairs and recover them we did.
It really wasn't a very difficult or time consuming process and the end result was dramatically different from what we started with. First, my husband and I stopped at Joann's going out of business sale and picked out a DARK fabric we both liked. I liked it A LOT but Phil finally caved and agreed to use it as well. He now likes it as well. I love that it's dark and has a print all over it because it makes any spills much harder to spot. While we were at Joann's, we also purchased some clear plastic to try out as well. More to come on that at the end of the post. We borrowed a staple gun and a compressor and would have finished this project in one evening except that we ran out of staples. So, it took us two evenings and probably a total of about 2-3 hours to recover all six chairs.
I first took the seat off of one chair and cut out six pieces of material with enough extra to wrap around the bottom edges of the chair. Phil and I then worked as a team to remove the rest of the seats and we recovered them together. It was much easier doing this with two people because one could make sure the material was straight and pulled tight while the other managed the staple gun. We stapled the new material right over the top of the old seat covers. The most time-consuming part of this project was screwing the seats back onto the chairs when we were finished.
On our last two chairs, we used the clear plastic we purchased to cover the material to make child-proof dining room chairs for each of our kids. We figured we would cover just two chairs with the plastic (over top of our new material) to use with the kids and that we'd rip it off when they outgrew the messy stage. We didn't put the plastic on all six because we thought it would be somewhat uncomfortable to sit on. We found out that it's actually not uncomfortable, sticky etc. If we were to do it again, we'd recover ALL six of our chairs with the plastic protection.
We love, love, love our new chair covers and although there have been a few spills on them, they still look amazing and I love that I can easily wipe off the two plastic covered chairs which we really try to have Taeya sit on when she eats. We now no longer dread sitting on our filthy dining room chairs and love how it's made our dining room look so much classier and cleaner.

Have you ever recovered something? Are your dining chairs in need of recovering? If so, give it a try! If you don't have access to a compressor and staple gun, you can purchase a hand held one that doesn't need a compressor at your local hardware store.
They stayed decently clean until Taeya came along. At first, we delegated her to one specific chair and also covered it with a dish towel to protect it. After a few months, she started moving around to different chairs for whatever reason or we'd have guests and she'd end up on a chair she didn't normally sit on. She also drank soy milk which she seemed to spill at nearly every meal. How does that happen? It always soaked through the towels and stained not only our chairs but her clothes as well. It wasn't long before our chairs looked like this:
 |
| Our original WHITE covered chairs at the end of their life |
Yuck! We didn't even like sitting on them, even though we knew they were just stained. It was DEFINITELY time to recover our white dining room chairs and recover them we did.
It really wasn't a very difficult or time consuming process and the end result was dramatically different from what we started with. First, my husband and I stopped at Joann's going out of business sale and picked out a DARK fabric we both liked. I liked it A LOT but Phil finally caved and agreed to use it as well. He now likes it as well. I love that it's dark and has a print all over it because it makes any spills much harder to spot. While we were at Joann's, we also purchased some clear plastic to try out as well. More to come on that at the end of the post. We borrowed a staple gun and a compressor and would have finished this project in one evening except that we ran out of staples. So, it took us two evenings and probably a total of about 2-3 hours to recover all six chairs.
 |
| The material we chose |
I first took the seat off of one chair and cut out six pieces of material with enough extra to wrap around the bottom edges of the chair. Phil and I then worked as a team to remove the rest of the seats and we recovered them together. It was much easier doing this with two people because one could make sure the material was straight and pulled tight while the other managed the staple gun. We stapled the new material right over the top of the old seat covers. The most time-consuming part of this project was screwing the seats back onto the chairs when we were finished.
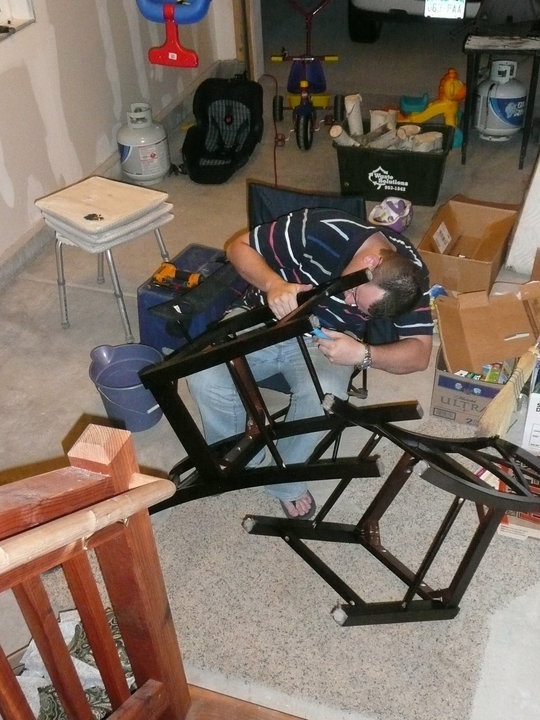 |
| Phil working on our chairs |
 |
| Three of my beautiful newly covered chairs. |
On our last two chairs, we used the clear plastic we purchased to cover the material to make child-proof dining room chairs for each of our kids. We figured we would cover just two chairs with the plastic (over top of our new material) to use with the kids and that we'd rip it off when they outgrew the messy stage. We didn't put the plastic on all six because we thought it would be somewhat uncomfortable to sit on. We found out that it's actually not uncomfortable, sticky etc. If we were to do it again, we'd recover ALL six of our chairs with the plastic protection.
 |
| Our plastic covered chair |
 |
| Plastic covered chair on the right, regular material on the left |
We love, love, love our new chair covers and although there have been a few spills on them, they still look amazing and I love that I can easily wipe off the two plastic covered chairs which we really try to have Taeya sit on when she eats. We now no longer dread sitting on our filthy dining room chairs and love how it's made our dining room look so much classier and cleaner.

Have you ever recovered something? Are your dining chairs in need of recovering? If so, give it a try! If you don't have access to a compressor and staple gun, you can purchase a hand held one that doesn't need a compressor at your local hardware store.
Thursday, April 7, 2011
Simply Homemade: A Repurposed Skirt
A friend passed down some play jeans to Taeya that had holes in the knees. My original idea was to put some cute patches on them. However, once I saw a tutorial for how to make a jean skirt on Saved by Naptime's blog, I knew that pair of jeans would be perfect for this project.

This afternoon, during nap time, I whipped out this cute little skirt and a matching belt. I love it. I had a difficult time with the pleats. The pleats on the back look great but the front ones don't. I also messed up the length of the hem on the front but learned as I went. Taeya's not a fan of jeans but loves skirts so I'm hoping I can get her to actually wear this skirt! Best of all, it was FREE as I made it with the jeans and material I had on hand.!!!

If anyone has anymore holey jeans they want to send my way, I'd be happy to take them off your hands. I think I'll make myself a jean skirt next time I wear down a pair of jeans from crawling after the kiddos.
I've been really enjoying finding ideas for re-purposed clothes online. I recently discovered that little girl dresses can be made with men's dress shirts. Of course, I have one half-finished from a dress shirt I picked up at the thrift store. Trying to figure out how to make the straps work with it. I'll post it when it's finished.


Do you re-purpose clothing at all? Have any good ideas/links to share? I'd love to see new ideas of how I can make our clothes go a little further.

This afternoon, during nap time, I whipped out this cute little skirt and a matching belt. I love it. I had a difficult time with the pleats. The pleats on the back look great but the front ones don't. I also messed up the length of the hem on the front but learned as I went. Taeya's not a fan of jeans but loves skirts so I'm hoping I can get her to actually wear this skirt! Best of all, it was FREE as I made it with the jeans and material I had on hand.!!!

If anyone has anymore holey jeans they want to send my way, I'd be happy to take them off your hands. I think I'll make myself a jean skirt next time I wear down a pair of jeans from crawling after the kiddos.
I've been really enjoying finding ideas for re-purposed clothes online. I recently discovered that little girl dresses can be made with men's dress shirts. Of course, I have one half-finished from a dress shirt I picked up at the thrift store. Trying to figure out how to make the straps work with it. I'll post it when it's finished.


Tuesday, March 29, 2011
Simply Homemade: Baby Food
Brecken is just getting to the point where he's beginning to eat baby food on a regular basis. As I did with Taeya, I'll be making my own. I find that it really doesn't take long at all, it costs very little and I can even make baby food for different stages.

This week, I started by peeling, cubing, and boiling 4 or 5 large sweet potatoes. I first took out about two cups of the hot water from the pot, I then strained the rest of the water off the sweet potatoes and poured about 1/3 of the cooked potatoes into my Vita-Mix. I pureed the sweet potatoes and added a little of the reserved water until it was the smooth consistency I was looking for. I put it into ice cube trays to freeze in small portions.
I then repeated the pureeing process two more times. However, the second time, I left some small lumps in the puree mixture to make it like a stage 2 baby food. On the third batch, I left larger lumps and also froze it in a Popsicle tray as I was out of ice cube trays and knew that Brecken would be able to eat the larger portions by the time he is eating the larger lumps.
Making baby food is very quick and easy. Best of all, by making it yourself, you know exactly what your baby is eating. Since I aim to have my babies eating table food by the time they are 10 months old, I really only have to make a few batches of baby food before they're eating what our family eats. I start offering finger foods as soon as they can pick it up. Brecken already feeds himself baby Mum-mums and loves them! At just under 5 months, he does really well getting the mum-mum into his mouth, sucking and even chewing on them.
Some of the things I puree into baby food are:
Bananas, Mango, Avacado, Pears, Peaches, Mixed berries, Peas, Organic carrots.
I've done applesauce in the past but this time I just bought a jar of 'no sugar added' applesauce because it's cost effective and what we eat as well. I purchase organic fruits/veggies sometimes but I'm not super worried about everything being organic. However, I do only buy organic carrots for babies because there is something that non-organic carrots can have that isn't good for young babies.
I don't do any sort of pureed meat because it's not realistic to what we eat. When he's a couple months older, I'll begin offering him small pieces of chicken to start with. He'll also get protein from beans and eggs.
If you've made baby food, what do you make? What advice do you have regarding baby food? Everyone does it a bit different and I'd love to hear what you think.
Monday, March 7, 2011
Recipe Round-up: Almond Puff
Well, I've spent the past few weeks packing, moving and unpacking. I'm about 90% done unpacking and I'm enjoying getting organized once again. I will be back to blogging more regularly soon.
The other day, we went to a friend's house for brunch. I made one of my mom's favorite recipes since she is visiting right now. The recipe is fairly quick and easy to prepare. It is sure to impress and it tastes absolutely delicious. It takes just a few minutes to make and put in the oven. However, it needs to bake for an hour so make sure you have the time before making it.

Almond Puff
From the kitchen of: Carm Allen.
Preparation time: 60 minutes
Preheat oven to 350 degrees.
Crust:
½ cup soft butter
1 cup flour
2 tablespoons water
Cut butter into flour. Sprinkle with water. Mix with fork. Round into a ball. Divide and put each half onto un-greased baking sheet. Shape into 12x3 inch strips (3 inches apart).
Puff Pastry:
½ cup butter
1 cup water
1 teaspoon almond extract
1 cup flour
3 eggs
In medium saucepan heat butter and water and bring to a rolling boil. Remove from heat. Add extract and flour. Stir over low heat 1 minute until it forms a ball. Remove. Beat in 3 eggs 1 at a time until smooth. The eggs should be fully incorporated. Spread over 2 strips. Bake 60 minutes at 350 degrees. Sprinkle with sliced almonds and drizzle on glaze. Allow to cool briefly and then cut into 1 inch strips.
Glaze:
½ cup confectionery sugar
2 tablespoons softened butter
1 teaspoon almond extract
1 tablespoon warm water
Mix until smooth.

Tip: The hardest part of this recipe is probably spreading the crust flat enough. When I make it, I try to make the crust as thin and long as possible. You want it to cover as much surface area as you can. I sometimes sprinkle a little flour on the top to help it not be so sticky as I press on it.
Monday, January 24, 2011
Simply Homemade: DIY Resolutions
In the beginning of January, I was reading Money Saving Mom and really liked the idea she had for New Year's Resolutions. She decided to try making one new thing each month that she hadn't made before to stretch herself and learn something new in the process. The link above will take you to her first project as well as her list of ideas.
I've been pondering doing the same thing but it took me the month of January to figure out what items I want to make. I have come up with one item for each month of the year but I am just going to make them whenever I have time, I won't necessarily assign each item to a specific month of the year. That way, if an item comes on sale or I have more time one month than another, I'll be able to take advantage of the sale or the free time to accomplish something on my list.
1. Name banner for Brecken's room using my friend's Cricut
6. Cake Pops
7. Make something from Ana White's Website
8. Wooden plaque for house
9. Homemade meatballs that my husband will like
 10. Easy Crazy Crayon Party Favors
11. Peppermint Playdough
12. Make marshmallows
Would you like to join me in finding some new things to try this year? I found a couple great posts that have lists of some really excellent ideas to try. I haven't had time to look at most of the links individually but the ideas look fabulous!
I've been pondering doing the same thing but it took me the month of January to figure out what items I want to make. I have come up with one item for each month of the year but I am just going to make them whenever I have time, I won't necessarily assign each item to a specific month of the year. That way, if an item comes on sale or I have more time one month than another, I'll be able to take advantage of the sale or the free time to accomplish something on my list.
1. Name banner for Brecken's room using my friend's Cricut
2. Cloth Wallet to store receipts in
3. Sweet Pepper Jelly-from the Sure-jell box. Will only use 10 jalapenos and both red & green peppers as told to me by my friend, Stephanie, whose jelly I LOVE.4. Kimono Shoes
5. Make curtains for at least one room in the house we move to6. Cake Pops
7. Make something from Ana White's Website
8. Wooden plaque for house
9. Homemade meatballs that my husband will like

11. Peppermint Playdough
12. Make marshmallows
Would you like to join me in finding some new things to try this year? I found a couple great posts that have lists of some really excellent ideas to try. I haven't had time to look at most of the links individually but the ideas look fabulous!
Saturday, January 22, 2011
Simply Homemade: Laundry Detergent
EDIT: I've updated this post as of June 2012 to include some things I've learned about laundry soap in the past year and a half.
This past year, in trying to save money everywhere we possibly could, I decided to try making homemade laundry detergent. I was incredibly pleased with the process and results. It is super easy to make and so economical as well. The ingredients will cost approximately $10 or so to start but you will be able to make laundry detergent for approximately two YEARS with what you purchase. One recipe makes 5 gallons of soap and there's enough borax and washing soda to make approximately 6 batches of soap before you use up the washing soda. That means, you can make approximately 30 gallons of laundry soap with your supplies (I am not counting the bar soap that you have to buy as well).
Supplies Necessary for Making Laundry Detergent:
1/2 to 1 bar of soap. You can use Dr. Bronner's if you want a great scented bar. You can also use Ivory, Dove, 1/2 bar of Zote or 1/2 Fels Naptha bar. (The last two are specifically laundry soap bars but are bigger than regular bars which is why you need to use only 1/2 a bar).
1 cup washing soda. This is also found in the laundry detergent aisle.
1/2 cup borax. Yup. Same place.
Optional: 5 drops of essential oils if you would like your soap to have a specific smell.
A pot to cook the soap in. You can use one of your own kitchen pots. It just needs to hold about 6 cups of liquid.
A Five Gallon Bucket. This is what I make my whole batch of soap in.
One or two large containers to store the soap in. I actually use a recycled plastic kitty litter container that the litter comes in. It is huge and will hold one full batch of soap.
An old laundry soap bottle or two. I fill these up from the larger container. This makes it much easier to measure and pour from a regular sized bottle than having to use the huge storage container. My detergent tends to separate over time so these smaller bottles are also convenient to shake up right before pouring.
Directions:
Allow to cool overnight and then mix well and pour into your containers. I do have to shake my bottles each time I use them as it tends to separate. I used a full-bar of Fels Naptha the first time and think it was too much which is why I cut the recipe back to 1/2 bar. Two different recipes I referred to said two different things. I tried it one way the first time and found that 1 bar made it too thick. The 1/2 bar of Fels Naptha is perfect. It is very similar to regular laundry detergent consistency.
Yields approximately 70 loads of laundry per batch if you use 1/2 cup of detergent.
Best of all, if you want to make homemade dishwasher soap, you can use the washing soda AND the borax for that recipe.
We made about 6 batches of laundry soap at my MOPS group with all the moms. We were able to make 6 batches in about an hour and a half! It only takes about 15 minutes per batch to make 5 gallons. So many of the moms were so excited about the laundry soap. A lot of them thought it would be a huge process and were surprised by how simple it was in the end.
Here's where I found my supplies:
Washing Soda-approx $4.00 at Walmart
Borax-approx $4.00 at Walmart
Fels Naptha-$2-4/bar. I found mine at City Market but you might find it at Walmart
Dr. Bronner's soap-$3.50/bar at Vitamin Cottage or a store that carries natural products
Enjoy!!
This past year, in trying to save money everywhere we possibly could, I decided to try making homemade laundry detergent. I was incredibly pleased with the process and results. It is super easy to make and so economical as well. The ingredients will cost approximately $10 or so to start but you will be able to make laundry detergent for approximately two YEARS with what you purchase. One recipe makes 5 gallons of soap and there's enough borax and washing soda to make approximately 6 batches of soap before you use up the washing soda. That means, you can make approximately 30 gallons of laundry soap with your supplies (I am not counting the bar soap that you have to buy as well).
Supplies Necessary for Making Laundry Detergent:
1/2 to 1 bar of soap. You can use Dr. Bronner's if you want a great scented bar. You can also use Ivory, Dove, 1/2 bar of Zote or 1/2 Fels Naptha bar. (The last two are specifically laundry soap bars but are bigger than regular bars which is why you need to use only 1/2 a bar).
1 cup washing soda. This is also found in the laundry detergent aisle.
1/2 cup borax. Yup. Same place.
Optional: 5 drops of essential oils if you would like your soap to have a specific smell.
A pot to cook the soap in. You can use one of your own kitchen pots. It just needs to hold about 6 cups of liquid.
A Five Gallon Bucket. This is what I make my whole batch of soap in.
 |
| My big container and my two smaller containers that I refill over and over. |
An old laundry soap bottle or two. I fill these up from the larger container. This makes it much easier to measure and pour from a regular sized bottle than having to use the huge storage container. My detergent tends to separate over time so these smaller bottles are also convenient to shake up right before pouring.
Directions:
Grate your bar of soap with a cheese grater. Cook over heat in 4 cups of water until dissolved. Fill a 5 gallon bucket half way with hot tap water. To this hot water add the pot of melted soap and water from the stove. Next add 1 cup of the Washing Soda and a 1/2 cup of the Borax Laundry Booster. Stir to mix.
 |
| This is what it looks like when it separates. I just give it a quick shake and it mixes up fine. |
The only thing I don't like about the process is cooking the soap on the stove. It makes my house smell very strongly of whatever soap you use. It's not a horrible smell but it is strong. I try to melt the soap as fast as I can and then air out my house quickly. I love making laundry soap. It doesn't take much time or money and it lasts forever and works just like the store-bought products.
Yields approximately 70 loads of laundry per batch if you use 1/2 cup of detergent.
 |
| My big kitty litter container of laundry soap. It was full to the TOP when I made the recipe. |
We made about 6 batches of laundry soap at my MOPS group with all the moms. We were able to make 6 batches in about an hour and a half! It only takes about 15 minutes per batch to make 5 gallons. So many of the moms were so excited about the laundry soap. A lot of them thought it would be a huge process and were surprised by how simple it was in the end.
Here's where I found my supplies:
Washing Soda-approx $4.00 at Walmart
Borax-approx $4.00 at Walmart
Fels Naptha-$2-4/bar. I found mine at City Market but you might find it at Walmart
Dr. Bronner's soap-$3.50/bar at Vitamin Cottage or a store that carries natural products
Enjoy!!
Saturday, January 15, 2011
Simply Homemade: Wooden Name Blocks
Christmas came this year after nine full months of unemployment. Needless to say, we didn't have much money to spare on gifts for family. I wanted to do something special but it needed to be simple and inexpensive. On A Thrifty Mom I saw the following idea and ended up creating four sets of Wooden Name Blocks. Mind you, I had a one-and-a-half month old baby at the time and a three year old. If I can do it, anyone can!
Here's what I ended up with:


 It cost me a total of about $8 to make all the gifts. I only needed to purchase two 2x4's and a can of black spray paint. A few friends helped make this project work. I borrowed the saw to cut the 2x4's, a belt-sander from another friend to smooth out the ends and round the edges. My friend, Annette, lent me her Cricut to cut the letters and also shared her scrapbooking paper and card-stock with me. (I would have purchased my own scrap booking paper but our nearest craft store is an hour away and it's not very thrifty to drive an hour to purchase paper). I have some pretty awesome friends! The mod-podge I had on hand from a past craft project.
Supplies You'll Need:
A 2x4
Black spray paint
Black cardstock
Coordinating scrap book paper
Mod-podge
A saw
A belt-sander (you can use sandpaper but it's MUCH easier if you can use an electric sander of some sort!)
Directions:
Write out the name you'd like to make in advance and decide what size blocks you want for each letter.
Cut the 2x4's to 4, 5, & 6 inch pieces to match what you need for the name.
Using a sander, sand the cut edges and round the corners a bit
Spray paint letters black (or whatever color you want). You may need two or three coats to cover the wood.
Once letters are fully dry, cut scrapbook paper to fit the blocks and mod-podge on.
Using a Cricut or Silhoutte machine (oh, the projects I would do if I owned one of these machines!) cut the letters for the name and mod-podge over the scrapbook paper.
Variation:
After I had made all my gifts-I finished them just in time to ship them out for Christmas and the shipping cost nearly three times what I spent to make the blocks-I made my name and decided to make the letters double sided. I put the same letter on both sides but used different designs for the letters and different color scrapbook paper. With this method, I can turn the letters around and have different "themes" with the same four blocks. See what I mean?
The original tutorial I used can be found here on A Thrifty Mom's blog. I made a few changes as you can see. I tried using a stamp pad to ink the edges...totally didn't work and I found it to be an unnecessary step. Also skipped putting felt on the bottom. These blocks are not rough and won't scratch the surface of whatever they're on. Again, an unnecessary step that is an extra expense.
I hope some of you attempt your own name blocks, either for yourself or as a gift. If you do, I'd love to see the finished product! This could also be a cute way to do a child's first name for their room using paint and paper colors that match their room. The possibilities are endless!
Here's what I ended up with:


Supplies You'll Need:
A 2x4
Black spray paint
Black cardstock
Coordinating scrap book paper
Mod-podge
A saw
A belt-sander (you can use sandpaper but it's MUCH easier if you can use an electric sander of some sort!)
Directions:
Write out the name you'd like to make in advance and decide what size blocks you want for each letter.
Cut the 2x4's to 4, 5, & 6 inch pieces to match what you need for the name.
Using a sander, sand the cut edges and round the corners a bit
Spray paint letters black (or whatever color you want). You may need two or three coats to cover the wood.
Once letters are fully dry, cut scrapbook paper to fit the blocks and mod-podge on.
Using a Cricut or Silhoutte machine (oh, the projects I would do if I owned one of these machines!) cut the letters for the name and mod-podge over the scrapbook paper.
Variation:
After I had made all my gifts-I finished them just in time to ship them out for Christmas and the shipping cost nearly three times what I spent to make the blocks-I made my name and decided to make the letters double sided. I put the same letter on both sides but used different designs for the letters and different color scrapbook paper. With this method, I can turn the letters around and have different "themes" with the same four blocks. See what I mean?
 |
| Red and Green. Our Christmas Theme |
 |
| Red, White and Blue. 4th of July theme |
|
| Red, blue, and tan. General theme. |
 |
| A Blue theme |
 |
| Another July theme. |
 |
| Notice the different "a" in this photo from the one below? |
 |
| Mix & Match. Lots of options! |
The original tutorial I used can be found here on A Thrifty Mom's blog. I made a few changes as you can see. I tried using a stamp pad to ink the edges...totally didn't work and I found it to be an unnecessary step. Also skipped putting felt on the bottom. These blocks are not rough and won't scratch the surface of whatever they're on. Again, an unnecessary step that is an extra expense.
I hope some of you attempt your own name blocks, either for yourself or as a gift. If you do, I'd love to see the finished product! This could also be a cute way to do a child's first name for their room using paint and paper colors that match their room. The possibilities are endless!
Subscribe to:
Comments (Atom)