Saturday, December 15, 2012

Reclaimed Wood Sign

This wooden sign brings a smile to my face and a reminder of who is to be worshiped and adored each time I walk through my living room. I am so thankful for my Savior and I want to be sure that my home  reflects that. I want my children to know Jesus Christ and his love for them. 


I've been seeing some beautiful signs on Pinterest for awhile and had the desire to create one for our household. A few weeks ago, while driving to pick up our Christmas tree, I drove past some old fence wood on the side of the road. It was too long for my car and full of nails but I grabbed what I could fit and went to get our tree. It was an adventure getting it all in the car but I'm so glad I stopped for this wood because it was beautiful! I went back for more two days later but sadly it was gone as I figured it would be.

In preparing for the Christmas season, I have been trying to find ways to bring Christ into our home in a  very visible way. I had a few sayings going through my head that I was trying to decide between. Here were my top four choices.

1. Wise men still seek Him
2. True love was born in a stable
3. for unto you is born this day in the city of David, a Savior who is Christ the Lord
4. Oh come let us adore Him Christ the Lord

I settled on number four and went to work. With two kids (2 and 4) I am able to accomplish a lot but I do almost all of my projects in little baby steps. Please note that this project took me about two weeks from start to finish. I cut the wood one night. I screwed it all together during a nap time. On another day, I worked on the graphic and it took about three different sessions to transfer the words to wood and paint them. If you want to do this, you CAN do it but it will take some time and isn't a 30 minute project...especially if you have young kids like me.

I first cut the wood. The sign ended up being about 26" wide and 20" long. I tried to use the wood from the ends as much as possible as they had the fence post ends and were weathered. I just left the saw cuts raw. I lined the wood up and then turned it over and placed two pieces of furring strip on the back that I had leftover from another project. I predrilled the furring strips and then sunk a screw through each furring strip into the fence wood and it was ready to paint.

Now came the hard part. If you want to make a sign exactly like mine, I'm happy to share a .jpg of the graphic for you to print. I downloaded some fonts that looked pretty and played around with the text, size and layout in Photoshop for quite some time until I ended up with the final product. I then printed it section by section until I had the whole graphic printed in pieces. I trimmed the edges off and taped the whole thing together. I then cut out the word "Lord" first and followed this tutorial from Pinterest to transfer the words to the wood using chalk and a ball-point pen. I immediately painted the word "Lord" so I wouldn't lose my chalk transfer. Next I worked on "Christ the." I slowly moved my way up the sign until I was finished. 


I have worked with transferring images to wood before and this chalk method was very easy to do and best of all, you don't need an expensive machine. Just a printer, chalk and a pen. I'm sure I'll be using the chalk method to make many more signs for my home and for friends. 


Here is the finished product hanging in my home. I predrilled two small holes in the side of the furring strips and twisted in little eye hooks. I then strung wire through the eye hooks to make a hanger on the back. I'm very pleased with the finished product and hope you're inspired to go make your own wood sign now. Total out of pocket cost = FREE.

I included the graphic I made at the bottom of this post. I don't know if this will work for you all who want it. Please let me know if you're able to save and print the graphic in a format that works for you or if I need to figure out something else to share it. 

Wednesday, December 12, 2012

Dishwasher Soap

I keep sharing this recipe with friends on Facebook so I thought I would add it to my blog so I could just direct them here. The recipe I use was originally found here. I have made one slight change that makes it much easier to use. I have been using this soap for a few months now and I haven't had any problems with it. My dishes appear clean and I haven't had any soap build-up on the glass. I make my own laundry soap with borax and washing soda so I always have most of these ingredients on hand.

I store my soap in an old baby wipe container and wrote the recipe on the side in permanent maker so I don't have to go look it up each time I need to remake it. I keep a measuring spoon from an old oxi-clean container inside so I always have a scoop ready to measure out the soap.

Mix together:
2 cups borax
2 cups washing soda
1 cup kosher salt

Use approximately 1 Tablespoon per load in addition to approximately 1 tsp of Lemi-Shine.

Although the original recipe has you mix the lemi-shine into the other ingredients, I have found that by leaving it separate, my mixture no longer clumps. It remains pourable/scoop-able and it's much easier to just add the lemi-shine separately than having to try to chisel pieces off of the clumped together soap.

Enjoy!!

Friday, October 14, 2011

Save A Penny: Recycled Milk Jug Sandwich Container

I have been loving Pinterest since I discovered it a month or so ago. If you don't know what it is, it's a virtual pinboard that you can pin any graphic you find on the web to. You create different boards with different category names (recipes, sewing, home decorating etc.). You can also search other people's pinboards and see ideas that they have pinned. The actual photos will take you back to the original post the photo was pinned from. There are many awesome tutorials. I found these sandwich containers made from recycled milk cartons on Pinterest. I love that I'm reusing our milk jugs and that these containers work so well for sandwiches. I can pack a sandwich for my husband's lunch or for a picnic with the kids without worrying that the sandwich will get crushed. They're easy to wash and reuse and only require a piece of velcro and a milk jug.

Sandwich and homemade container

Sandwich container made from a milk carton


There's a crease in the bottom of the milk carton so it works best to cut the sandwich at a diagonal.

Tuesday, October 11, 2011

Save A Penny: Painted Horizontal Striped Dropcloth Curtains


Before
Recently, I started working on redecorating my son's room. We live in a rental and the walls in his room were peach (3 walls) and a burnt orange color. Needless to say, I wasn't a fan and haven't done anything with his room since we moved in months ago.

I recently had some time in my schedule and received permission to repaint the room so I got to work. I painted the walls Dover White. It's so nice to have a clean slate to work on. If we owned the home, I might have done something a bit more daring than white but since it's a rental, I wanted it to be neutral.

I rearranged the furniture just a little and refinished a chair with some new paint and a new pad. I painted the chair blue and decided that the white curtains that I borrowed from my daughter's room didn't do enough with the white walls. I found a tutorial on painted curtains on Pinterest that I loved so I decided to give painted curtains a try. I absolutely love the end result. I still need to change up the bedspread but overall, I love his room so much more now than I did two weeks ago!

Here's how you can make your own painted curtains. 

Supplies:
2 drop cloths (or regular curtains if you'd prefer)
1 gallon of paint (I used nearly a quart on just ONE curtain)
A small foam roller and paint tray
Blue painters tape
Plastic to put under the drop cloth as you paint.


I purchased two drop clothes from Home Depot. I didn't have much of a choice because HD is all we have here but I've read if you want to use drop cloths, Home Depot is the place to go. Lowe's has them but many of them have a seam down the middle. I purchased two 6'x 9' canvas drop cloths for just over $10 apiece. 

1. Wash the drop cloths.
2. Iron them out. This takes some time since they are so large. I found that the highest setting was too hot for them. They needed a medium setting. I didn't use starch because I didn't want to have issues with the paint if I used starch.
3. Hem your cloth to the length you want. I have 8' ceilings and I wanted them to go from ceiling to floor so they are 94" long. I folded down the edge to 94" and then sewed the hem. 
4. Decide how many rows you want and how wide you want each row to be. I was planning on doing each line 6 1/4" but after I painted the first curtain and was measuring the second, I found that I had actually made the blue liens 6 1/2 and the white was 6 1/4. You can't tell but it made my last line on the bottom a little shorter as a result.
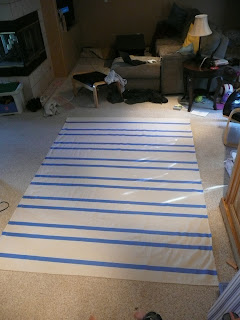
5. Carefully tape off each row that you will paint. The wider the tape, the more likely it will be that you won't mess up while painting. I used 1 1/2" tape because that's what I had on hand. I didn't make mistakes but if I were buying it, I'd purchase it a little wider just to be safe. I taped off one curtain, painted it and let it dry then tried taping off the other curtain. On the second curtain, I kept making mistakes while I taped so I finally laid the first, finished curtain underneath to help me as a guide. I'm SO GLAD I did this as the lines would have been totally off if I had taped them separately. I'd highly recommend lining them up together to make sure you tape them the same.
When taping your second curtain, line your first up underneath to make sure you tape it correctly!!


Tip: I wanted the top line white and both times I started taping I messed up and put the tape where the blue line would be painted. I had to peel it off and start over. Make sure you start off correctly with your tape after deciding if you want the top painted or white.

Because the tape has to stay only in the part that's staying white, it creates sort of an optical illusion with the lines.Your lines should LOOK wide and narrow if you want even lines.

6. Lay down your plastic and tape the edges. Lay your curtain on top and begin painting. I sat on a piece of brown paper that helped in case I accidentally stepped in paint or got it on my pants or something. I didn't want to worry about accidentally smudging paint onto the wrong area of the curtain.
7. Load that paint roller and start painting. The drop clothes absorb A LOT of paint so don't skimp. I got pretty good coverage but really should touch up the curtains because with the light shining through them, you can see some areas that need a bit more paint. The back of the curtain doesn't look nearly as pretty as the front. I'd recommend sewing a panel to the back if you want it to look pretty. You can also try to paint the lines on the back. However, I haven't tried this and I'm not sure that it wouldn't ruin the front if you did that so be cautious. 

8. Peel off the tape carefully. Don't allow it to touch down on the curtain! Allow to dry overnight and then the curtains are ready to hang!

All finished!!!


Saturday, October 8, 2011

Simply Homemade: Canned Fruit

Well, my blog has been hibernating over the summer months. We're now into Fall and I'm hoping life will slow down a bit during these colder months. I put my blog on the back burner because I have been doing so many projects these past months I just haven't had time to blog. However, I'd like to get back into it, both on this blog and on our family blog.
Homemade Cinnamon Pears

The past few years, I have been doing some canning for our family. With having Brecken last November, I didn't even try to can anything. However, this year, I have made four loads (7 qts/load) of cinnamon pears, 2 loads of apple pie filling, 2 loads of peaches and one batch of applesauce (so far). Some of this was done with one of my friends and some of it I did alone.

Growing up, my mom canned every summer and my sister and I would help her. We always got our fruit from a local farm. When I lived in Silt, CO, I had a friend, Kristi, who used to stop at people's houses who had fruit trees where the fruit was dropping unused onto the ground. She would stop and ask them if they were going to use their fruit and ask if she could pick the fruit if they weren't going to use it. I have now been doing this for a couple years and have hardly had to pay for any of the fruit I have canned. I've received tons of free apples, free pears and found free plum trees on the side of a frontage road that wasn't on anyone's property. I've also posted on Freecycle asking for free fruit and have received responses each time. This makes for an awesome deal on fruit for our family. All I end up paying for is sugar for preserving and lids if I need them for my jars.

I was running out of canning jars recently so I also asked on Freecycle for mason jars. Just yesterday, I picked up 7 BOXES full of canning jars. That should keep me busy for awhile! (I'll be sharing them with my friend as well). So, if you're interested in canning but maybe don't want to shell out a lot of money to get started, keep your eyes open for fruit that you can pick yourself and ask on Freecycle. Find a friend who has canning supplies (waterbath/pressure canner etc.) that you can borrow. Canning is also much more fun with a friend. It's a lot of work but it truly is worth it.

I'd like to share my apple pie filling recipe. It's easier to make than applesauce because you just have to peel and slice the apples and stuff them into jars. No cooking down and putting them through the strainer. Here's the recipe. It's a great one!!

Apple Pie Filling
Makes enough filling for 7 quarts of pie filling.
Mix together: 4 ½ cups sugar, 1 cup cornstarch, 2 teaspoons cinnamon, 1 tsp salt, 1 teaspoon nutmeg. Wisk together the dry ingredients before adding water to prevent lumps.
Add: 10 cups water
Cook until thick and bubbly while stirring occasionally.
Peel, core and slice about 32 apples. Pack raw apples in jars and pour syrup over. Fill to w/in ½ inch of rim.
Cooking Time in a pressure canner: 5 lbs at 10 minutes add 1 lb pressure for each 1,000 feet

Also, if you'd like to make cinnamon pears, just add a teaspoon of cinnamon to your syrup. They taste so amazing with the addition of cinnamon!

Thursday, April 21, 2011

Simple Kitchen Shortcut: Cleaning A Burnt Pot

Every now and then, I burn a pot while cooking. It doesn't happen too often and usually, with a bit of elbow grease I can scrub it off. However, one time I made a very large pot of soup in my biggest and nicest stock pot. I had it on low to keep it warm during a party and unfortunately burned the whole batch. The bottom of the pot was badly burned. It had a very thick, black and incredibly hard layer of burnt soup on the bottom! I tried everything I could think of to get my pot clean. I boiled water in it, cleaned it with tough scrubbers and cleaners, soaked it for a couple days. Although the burnt residue came off a little, I still had a very burnt layer on the pan that I was unable to remove. I even boiled tin foil in the pot because I heard that worked...it didn't. If it had been one of my cheaper pans/pots I probably would have just thrown it away. However, I wanted to keep this pot and wanted to get it clean.

I asked people for advice and someone (maybe my sister?) suggested boiling a dryer sheet in the pot. Since I don't have any dryer sheets (I use dryer balls) I finally asked my friend for one and tried it out. Boiling the dryer sheet made my house smell very strongly of dryer sheet but it totally worked! I was elated. I had no problem scrubbing out ALL of the remaining residue after using the dryer sheet. It still took a little bit of elbow grease but I could immediately tell a difference and it actually was able to come off this time. So, if you have a pot or pan you need to salvage, try a dryer sheet. You might also try soaking it in water without boiling it. There's a chance that might work without having to breathe in all the dryer sheet fumes.

Do you have any other tips for cleaning difficult pots and pans?

Monday, April 11, 2011

Simply Homemade: Reupholstered Dining Room Chairs

This is one of my favorite DIY projects to date. When Phil and I decided to purchase a new dining room table (pre-kids), we loved the table we purchased but weren't super excited about the white, yes, WHITE material that the chairs were covered with. We decided that we'd buy the chairs and someday, when the white was no longer that color, that we'd reupholster them.

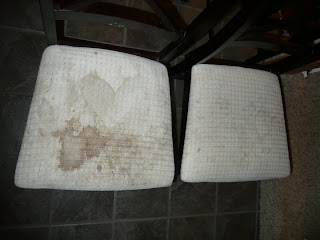
They stayed decently clean until Taeya came along. At first, we delegated her to one specific chair and also covered it with a dish towel to protect it. After a few months, she started moving around to different chairs for whatever reason or we'd have guests and she'd end up on a chair she didn't normally sit on. She also drank soy milk which she seemed to spill at nearly every meal. How does that happen? It always soaked through the towels and stained not only our chairs but her clothes as well. It wasn't long before our chairs looked like this:
Our original WHITE covered chairs at the end of their life

Yuck! We didn't even like sitting on them, even though we knew they were just stained. It was DEFINITELY time to recover our white dining room chairs and recover them we did.

It really wasn't a very difficult or time consuming process and the end result was dramatically different from what we started with. First, my husband and I stopped at Joann's going out of business sale and picked out a DARK fabric we both liked. I liked it A LOT but Phil finally caved and agreed to use it as well. He now likes it as well. I love that it's dark and has a print all over it because it makes any spills much harder to spot. While we were at Joann's, we also purchased some clear plastic to try out as well. More to come on that at the end of the post. We borrowed a staple gun and a compressor and would have finished this project in one evening except that we ran out of staples. So, it took us two evenings and probably a total of about 2-3 hours to recover all six chairs.
The material we chose

I first took the seat off of one chair and cut out six pieces of material with enough extra to wrap around the bottom edges of the chair. Phil and I then worked as a team to remove the rest of the seats and we recovered them together. It was much easier doing this with two people because one could make sure the material was straight and pulled tight while the other managed the staple gun. We stapled the new material right over the top of the old seat covers. The most time-consuming part of this project was screwing the seats back onto the chairs when we were finished.
Phil working on our chairs

Three of my beautiful newly covered chairs.

On our last two chairs, we used the clear plastic we purchased to cover the material to make child-proof dining room chairs for each of our kids. We figured we would cover just two chairs with the plastic (over top of our new material) to use with the kids and that we'd rip it off when they outgrew the messy stage. We didn't put the plastic on all six because we thought it would be somewhat uncomfortable to sit on. We found out that it's actually not uncomfortable, sticky etc. If we were to do it again, we'd recover ALL six of our chairs with the plastic protection.
Our plastic covered chair

Plastic covered chair on the right, regular material on the left

We love, love, love our new chair covers and although there have been a few spills on them, they still look amazing and I love that I can easily wipe off the two plastic covered chairs which we really try to have Taeya sit on when she eats. We now no longer dread sitting on our filthy dining room chairs and love how it's made our dining room look so much classier and cleaner.


Have you ever recovered something? Are your dining chairs in need of recovering? If so, give it a try! If you don't have access to a compressor and staple gun, you can purchase a hand held one that doesn't need a compressor at your local hardware store.